- Laptops & 2-in-1s
- Business
- Premium
- Gaming
- Laptops
- ZBook Workstations
- Convertibles &
detachables - Deals
- Printers
- Home &
home office - Business
- Sprocket
- Print
only - Multifunction
- Scanners
- Large format &
digital presses
- Laptops & 2-in-1s
- Business
- Premium
- Gaming
- Laptops
- ZBook Workstations
- Convertibles &
detachables - Deals
- Printers
- Home &
home office - Business
- Sprocket
- Print
only - Multifunction
- Scanners
- Large format &
digital presses
HP Sprocket 2-in-1s - Using the Camera Features
This document is for HP Sprocket 2-in-1s in Camera Mode, and the HP sprocket app for Android mobile and Apple iOS devices.
Read this document to learn about the HP Sprocket 2-in-1 camera features.
Use the Selfie Mirror
Use the Selfie Mirror on the Viewfinder to take a selfie with the camera.
-
Load HP sprocket photo paper.
-
Turn on the Sprocket, and then press down on the Viewfinder.The Viewfinder opens.
caution:
Do not pull up on the Viewfinder or try to pry it open. This can damage the locking mechanism.-
Press down on the Viewfinder
-
The Viewfinder opens
Figure : Pressing down on the Viewfinder -
-
Turn the Sprocket so the camera is facing you, use the Selfie Mirror on the Viewfinder to adjust the photo position, and then press down on the Shutter button.The instant photo prints.
Use the microSD card
You can install a microSD card (sold separately) to save instant photos taken with the camera, and then transfer them from the Sprocket to your computer.
Install the microSD card
Install the microSD card into the Sprocket.
-
Turn off the Sprocket, and then locate the microSD slot next to the tripod mount access area.
-
Insert the microSD card into the slot with the electrical contacts facing toward the camera.Figure : Inserting the microSD card
-
Push in the microSD card gently with your fingernail until you hear a soft click and the card is flush with the Sprocket.If the microSD Storage light is solid and red, there is a microSD card error. Turn off the Sprocket, reinstall the microSD card, and then turn on the Sprocket.
Transfer photos from the Sprocket to computer
Use the USB cable that came with your sprocket to transfer photos to your computer. To save and transfer instant photos taken with the camera, a microSD card must be installed.
-
Connect the cable to the Micro-USB Charge Port, and then connect the other end of the cable to a computer USB port.
note:
You cannot print with the Sprocket while it is connected to the computer.-
Connecting the cable to the Micro-USB Charge Port
-
Connecting the cable to a computer USB port
Figure : Connecting the cable to the Sprocket and computer -
-
On your computer, use a file browser, such as File Explorer (Windows) or Finder (Mac), to locate the Sprocket removable storage drive.
-
Windows: Open File Explorer, and then click Computer or This PC from the navigation column. Select the removable storage drive under the Devices with Removable Storage or Devices and drives section. If the microSD card has not been given a name, the removable storage drive might only show up as a letter, such as (D:).
-
Mac: Open Finder, and then locate the removable storage drive under the Devices section. If the microSD card has not been given a name, the removable storage drive might show up as NO NAME.
-
-
Browse the drive folders to locate the photos you want to transfer, and then transfer the photos into a folder on the computer, such as Pictures or Documents.
-
Turn off the Sprocket, and then disconnect the cable from the computer.
Use the 10-second timer
Use the Timer button for a 10 second delay between pressing the Shutter button and photo capture.
-
Turn on the Sprocket, and then press down on the Viewfinder.The Viewfinder opens.
caution:
Do not pull up on the Viewfinder or try to pry it open. This can damage the locking mechanism.-
Press down on the Viewfinder
-
The Viewfinder opens
Figure : Pressing down on the Viewfinder -
-
Turn on the 10-second timer by pressing the Timer button next to the Shutter button.The Timer button light turns solid and white.
note:
The 10-second timer automatically turns off after each instant photo.Figure : Pressing the Timer button -
Raise the Viewfinder to your eye, and then press down on the Shutter button.The camera flash blinks slowly for seven seconds, and then quickly for the final three seconds. If you want to cancel the 10-second timer, press the Timer or Shutter button again.The camera takes the instant photo, and then prints.
Use the camera flash
Use the HP sprocket app to change the camera flash settings.
-
Turn on the Sprocket.
-
On your mobile device, open the HP sprocket app.
-
Tap the Menu icon , and then tap sprocket.
-
Tap Printers, and then tap your sprocket in the list.The Sprocket information screen displays.
-
Tap Flash under the Settings section.The Flash settings display.
-
Select the desired flash setting.
-
Auto: The camera flashes depending on environmental lighting conditions.
-
On: The camera always flashes for each instant photo.
-
Off: The camera never flashes.
-
-
Tap the back button on your mobile device to save the setting.
Use a tripod mount
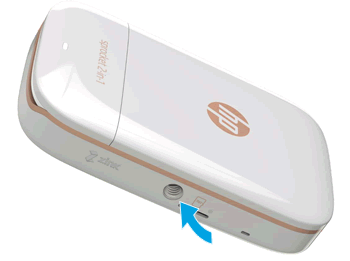
Placing the Sprocket on a tripod (sold separately) provides additional camera stability and makes it easier to take group photos.
Place the tripod attachment into the tripod mount access area, and then rotate until secure.
Figure : Location of the tripod mount access area
Please help us improve by providing feedback on your experience with the document.
Examples: "Sprocket paper jam", "Sprocket firmware update"
Language:
English
- Arabic (العَرَبِيَّة)
- Chinese Simplified (简体中文)
- Chinese Traditional (繁體中文)
- Dutch (Nederlands)
- English
- Finish (Suomi)
- French (Française)
- German (Deutsche)
- Greek (Ελληνικά)
- Hebrew (עִברִית)
- Italian (Italiano)
- Japanese (日本語)
- Korean (한국어)
- Polish (Polski)
- Portuguese (Português)
- Russian (Русский)
- Spanish (Español)
- Sweddish (Svenska)
- Turkish (Türkçe)
HP Sprocket
- Privacy|
- Terms of Use|
- Cookie Policy
- Cancer and Reproductive Harm - www.P65Warnings.ca.gov
© Copyright 2025 C&A Marketing, Inc. is the manufacturer of the HP® Sprocket®, under license from HP, Inc. HP and Sprocket trademarks are owned by HP Inc. or its affiliates. ZINK® Technology and ZINK® Trademarks are owned by ZINK Holdings LLC., used under license.